Thank you! Your PDF is on the way! Check your Email for a link.
Thank you! Your submission has been received!
Oops! Something went wrong while submitting the form.
Unity
prefabs in unity: Unity Basics Part 7
Prefabs are reusable GameObject templates that work like smart stencils—create once, use everywhere. When you modify a Prefab, all instances automatically update. Perfect for coins, enemies, trees, or any repeated objects. Prefab Variants allow customization while maintaining base connections. This system enables consistency, efficiency, and easy maintenance across large projects with hundreds of identical objects.
Imagine you've just finished creating the perfect enemy character for your game—complete with detailed 3D model, smooth animations, intelligent AI scripts, particle effects, and sound components. It took hours to get everything just right. Now you need 50 copies of this enemy scattered throughout your levels. Do you manually recreate each one from scratch? What happens when you later decide the enemy needs stronger armor or different attack sounds?
This is where Unity's Prefab system becomes your best friend. Prefabs are like smart copy-and-paste on steroids—reusable templates that let you create identical objects across your game, but with the magical ability to update all copies instantly when you modify the original. It's the difference between hand-drawing 100 identical trees and using a stencil that automatically updates every tree when you improve the design.
This is the seventh article in our Unity Basics series for beginners. We've covered Unity's interface, GameObjects, visual design, physics, and scripting. Now we're exploring one of Unity's most powerful workflow features—Prefabs, which transform how you build and maintain complex projects.
The Stencil Metaphor: Understanding Prefabs
Think of a Prefab as a master stencil or template. When you create a stencil, you design it once, then use it to create identical copies quickly and consistently. But Unity's Prefabs are even smarter than physical stencils—they maintain a live connection between the template and all its copies.
How this works in practice:
Create a perfect coin collectible with spinning animation, sparkle effects, and collection sound
Turn it into a Prefab template
Place 200 copies throughout your platformer levels
Later decide the coin should be gold instead of silver
Change the material on the original Prefab
All 200 coins automatically update to gold
This isn't just convenient—it's essential for any serious game development. Professional studios might have thousands of GameObjects in their scenes, and manually updating each one would be impossible.
Real-World Prefab Examples
Platformer Game:
Coin Prefab: Spinning collectibles with particle effects and audio
Enemy Prefab: Complete with AI, animations, health systems, and death effects
Platform Prefab: Reusable level geometry with consistent collision and materials
Power-up Prefab: Special items with unique effects and UI integration
Forest Environment:
Tree Prefabs: Different species with variations in size and seasonal colors
Rock Prefabs: Various boulder and stone formations for natural scatter
Grass Clump Prefabs: Small environmental details that add visual richness
Wildlife Prefabs: Birds, insects, and small animals with behavioral scripts
UI System:
Button Prefab: Consistent styling, hover effects, and click sounds
Dialog Box Prefab: Standard conversation interface with character portraits
Health Bar Prefab: Reusable UI element for players, enemies, and vehicles
Menu Panel Prefab: Standardized layout containers for different screens
Creating Your First Prefab: The Spinning Coin
Let's walk through creating a classic collectible coin Prefab to demonstrate the entire workflow:
Step 1: Building the Master Object
Create a Cylinder (GameObject → 3D Object → Cylinder)
Scale it to coin proportions: X: 1, Y: 0.1, Z: 1 (thin and flat)
Create a golden material and apply it to make it look valuable
Add a gentle spinning script to make it rotate slowly around the Y-axis
Add particle effects for a subtle sparkle or glow
Include an Audio Source component with a pleasant "ding" sound
Step 2: Converting to Prefab
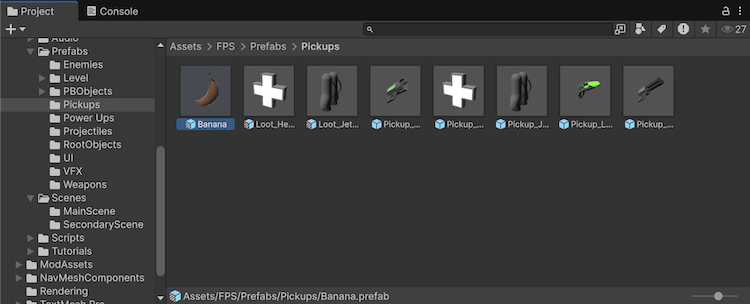
Drag the completed coin from the Hierarchy to the Project panel
Unity automatically creates a Prefab asset (notice the blue cube icon)
The original object in the scene becomes a Prefab instance (shows blue text in Hierarchy)
Name your Prefab something descriptive like "CoinCollectible"
Step 3: Creating Multiple Instances
Drag the Prefab from Project panel into your scene multiple times
Each copy maintains connection to the original Prefab template
Position coins throughout your level where players should find them
Notice they all spin and sparkle identically
Step 4: Testing the Magic
Double-click the Prefab asset to enter Prefab editing mode
Change the material color to silver or bronze
Adjust the spinning speed or add new particle effects
Exit Prefab mode and watch all coins update automatically
No manual updating required—every instance reflects your changes
Prefab Variants: Organized Flexibility
Sometimes you want objects that are mostly identical but with specific differences. Unity's Prefab Variants system handles this perfectly:
Base Enemy Prefab: Standard health, movement, and AI
Variant: Fire Enemy: Adds flame particles and fire damage
Variant: Ice Enemy: Adds frost effects and freeze attacks
Variant: Boss Enemy: Increases scale, health, and adds special abilities
Base Tree Prefab: Standard trunk and branching structure
Variant: Spring Tree: Green leaves and small flowers
Variant: Autumn Tree: Orange/red leaves with falling leaf particles
Variant: Winter Tree: Bare branches with snow accumulation
Changes to the base Prefab automatically propagate to all variants, while each variant maintains its unique modifications.
The Power of Nested Prefabs
Advanced Prefab usage involves combining multiple Prefabs into more complex assemblies:
This modular approach means updating the Window Prefab automatically improves all buildings that use it.
Prefab Overrides: Customizing Instances
Sometimes you need most instances to match the Prefab, but with minor individual adjustments:
Enemy Placement Example:
Most enemies use standard patrol routes
One specific enemy guards a treasure chest (different position)
Another enemy has double health for a boss fight (modified component values)
A third enemy uses a different weapon model (swapped child object)
Unity tracks these "overrides" and lets you:
Apply overrides back to the Prefab (makes the change universal)
Revert overrides to match the Prefab (removes custom changes)
Compare changes visually to see what's different
Workflow Benefits: Why Prefabs Transform Development
Consistency: Every instance looks and behaves identically unless specifically overriddenEfficiency: Create complex objects once, reuse them hundreds of times instantlyMaintainability: Update game balance, fix bugs, or improve visuals across all instances simultaneouslyCollaboration: Team members can use standardized Prefabs without recreating common elementsIteration Speed: Experiment with different designs and see changes reflected everywhere immediately
Common Prefab Patterns and Best Practices
Environmental Assets
Create Prefab collections for different biomes (forest, desert, arctic)
Use empty GameObject containers for complex multi-part objects
Include LOD (Level of Detail) components for performance optimization
Interactive Objects
Combine visual, audio, and script components into cohesive Prefabs
Use consistent naming conventions for easy project navigation
Document Prefab purposes with clear descriptions and organized folder structures
UI Elements
Standardize button styles, panel layouts, and text formatting
Create responsive Prefabs that work across different screen sizes
Include animation components for consistent user experience
Troubleshooting Common Prefab Issues
"My changes aren't applying to all instances"
Ensure you're editing the Prefab asset, not just a scene instance
Check if instances have overrides that prevent changes from propagating
Verify you're modifying the base Prefab rather than a variant
"I broke the connection between my Prefab and instances"
Use the "Revert" button in the Inspector to restore Prefab connections
Consider using "Apply All" to push instance changes back to the Prefab
"My nested Prefabs aren't updating correctly"
Understand the hierarchy—changes propagate down from parent to child Prefabs
Check that child Prefabs aren't overridden at the parent level
Use Prefab mode to visualize nested relationships clearly
Performance Considerations
Memory Efficiency: Prefabs share resources like materials and meshes, reducing memory usage compared to unique objectsLoading Times: Fewer unique assets mean faster level loading and better performanceRendering Optimization: Identical Prefab instances can be batched together for more efficient rendering
Best practices for performance:
Use Prefabs for any object that appears more than once
Optimize the base Prefab since improvements benefit all instances
Consider asset bundling for downloadable content and updates
Advanced Prefab Techniques
Scriptable Object Integration: Store Prefab configurations in data assets for easier balancingRuntime Instantiation: Spawn Prefab instances dynamically during gameplayAsset References: Load Prefabs on-demand to reduce memory usagePrefab Pooling: Reuse Prefab instances for frequently created/destroyed objects like bullets or particles
What's Next: Building Systems with Prefabs
Now that you understand how Prefabs streamline object creation and maintenance, you're ready to explore Unity's Scene Management system. In our next article, we'll learn how to organize complex projects across multiple scenes, creating seamless transitions between levels, menus, and different game areas.
We'll cover:
Scene hierarchy and organization strategies
Loading and unloading scenes efficiently
Persistent objects that survive scene changes
Creating smooth transitions and loading screens
Managing data flow between different scenes
Prefabs and Scene Management work hand-in-hand—Prefabs help you create consistent objects within scenes, while proper scene organization helps you structure entire game experiences. Together, they form the backbone of professional Unity project organization.
The skills you're building aren't just about individual Unity features—you're learning the systematic thinking that separates hobbyist projects from professional game development workflows.
Ready to see the magic in action? Watch our demonstration video where a single Prefab becomes an army of enemies, and then see how changing one setting instantly transforms the behavior of dozens of objects throughout an entire level.
Looking for a reliable partner for your next project?
At SLIDEFACTORY, we’re dedicated to turning ideas into impactful realities. With our team’s expertise, we can guide you through every step of the process, ensuring your project exceeds expectations. Reach out to us today and let’s explore how we can bring your vision to life!